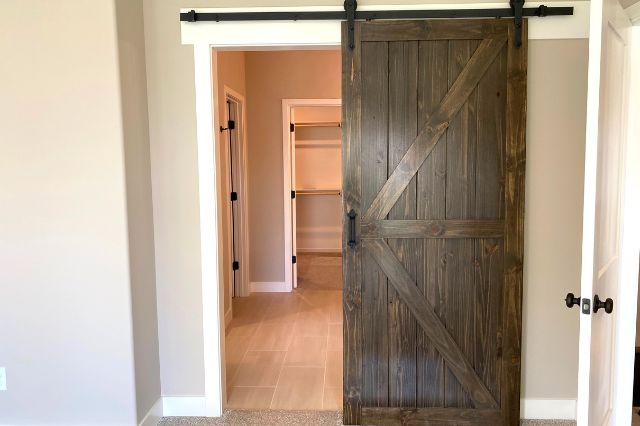
How to Build a Interior Barn Door
Hey there, DIY enthusiast! So, you’re thinking about adding a touch of rustic charm to your space with an interior barn door? Awesome choice! It’s not just about functionality; it’s about infusing your personality into your home.
In this guide, we will show you how to create interior barn doors that match your style and meet your needs.
So, grab your tools and let’s get started!
Step 1: Planning Your Doorventure
Before you start measuring and sawing, take a moment to envision what you want. How big should it be? What style suits your vibe – reclaimed wood for that vintage look or sleek birch plywood for a modern twist?
Now, grab your measuring tape and pencil, and get those dimensions down. You want this door to fit like a glove, right? Consider where you’ll place it and how it’ll blend with your existing decor. Once you’ve got the vision, it’s time to move on to materials and tools.
Step 2: Materials and Tools
Alright, it’s time to get your hands on the good stuff. Here’s your shopping list:
Materials:
- Wood planks or plywood
- Wood glue
- Sandpaper (various grits)
- Stain or paint
- Polyurethane or clear sealant
Tools:
- Circular saw or table saw
- Miter saw
- Wood screws
- Screwdriver
- Clamps
- Wood stain brushes or rollers
- Measuring tape
- Pencil
Got it? Great! Now, let’s move on to the next part – bringing your vision to life.
Step 3: Take Measurements
Okay, so imagine you’re the architect of your own door. Before anything else, measure that door frame.
You want to know how much real estate your future barn door will be conquering. Consider the width – barn doors usually slide horizontally, so make sure it spans the entire opening. Height and thickness matter, too, ensuring a snug fit.
Sketch a rough design, think about adding crossbars or any decorative elements, and don’t forget about existing features like baseboards or moulding that might play into your door’s grand entrance.
Step 4: Choose Your Wood
Now, the wood selection is like picking the main character for your DIY saga. Go for a high-quality wood like oak, pine, or cedar. These woods bring the sturdy, rustic vibe you’re after.
If you’re budget-conscious, plywood can be a sidekick, offering a cost-effective alternative for the door panels. Feeling adventurous? Consider reclaimed wood for that eco-friendly, unique twist. Knots and imperfections only add character!
Step 5: Cut the Wood
Time to get hands-on! Use that saw to cut your wood pieces according to the measurements and design you’ve lovingly outlined.
If your design involves some cool crossbars or intricate details, a jigsaw might be your superhero tool. Safety first, folks! Take your time, use the proper safety gear, and watch those fingers. Accuracy and clean cuts are your goals here.
Step 6: Assemble the Door
Now, picture yourself as a master puzzle solver. Lay out those cut pieces, apply wood glue to the edges, and piece them together.
Secure the joints with wood screws, making sure everything is snug and square. This is your door coming to life, so revel in the moment.
Once it’s all glued up, be patient and let it dry completely before moving on. Rome wasn’t built in a day, and neither is your barn door!
Step 7: Sanding and Smoothing
Alright, it’s time to give your creation that smooth, polished finish. Grab that sandpaper and go to town.
Pay extra attention to edges and corners – we’re aiming for a seamless, splinter-free masterpiece. If you find any gaps or imperfections, a little wood filler is like the magic touch-up tool. Sand again for that flawless surface.
Pro tip: if you’re going for a weathered look, strategically sand certain areas to add that rustic charm.
Step 8: Finishing Touches
Now, let’s bring some personality into play. Time to paint or stain your door! Pick a shade that complements your existing decor, or go bold for a statement piece.
Follow the instructions on your chosen paint or stain, and once it’s dry, seal the deal with a coat of polyurethane. This not only protects your creation but gives it that extra shine.
If you’re feeling daring, consider distressing techniques or add decorative hardware for an industrial twist.
Step 9: Installing Barn Door Hardware
Now comes the moment of truth – turning your wooden masterpiece into a sliding barn door.
You’ll need that barn door hardware kit. It usually comes with a track, rollers, and all the screws you’ll need.
Follow the kit instructions, mount the track securely above the doorway, attach the rollers to the top of your door, and voila – test the sliding mechanism. Marvel at the smooth, effortless movement of your very own DIY barn door!
Step 10: Customizing Hardware and Accessories
Don’t stop there! Let’s add those finishing touches to make your door truly yours.
Choose handles, pulls, and locks that not only serve a purpose but also complement your door’s design. It’s like picking out jewellery for your creation.
Get creative – repurpose vintage hardware or explore DIY options for a unique touch. Soft-close mechanisms are a great addition for a quiet and controlled closing, especially if you’ve got light sleepers at home.
Conclusion
Congratulations, DIY maestro! You’ve just crafted a door that’s not just functional but a statement piece in your home. Building your interior barn door isn’t just a project; it’s a journey.
So, pat yourself on the back, admire your handiwork, and revel in the fact that every time someone slides that door, they’re witnessing a piece of your craftsmanship.
Happy crafting!